Showing posts with label Pickle. Show all posts

Monday, August 20, 2018

Chundo (Sweet Mango Pickle)

Chundo is a classic Gujarati sweet and spicy mango pickle that is made with raw mangoes, sugar and some spices. Chundo and thepla are a famous combination for most. Even children enjoy this pickle due to its taste. Make sure when you make this pickle that the mangoes are sour and are raw. They should not have the yellowish pulp, but rather have greenish pulp. Sweet and sour flavored Chunda is translucent and beautifully colored.

Preparation Time: 1 hour + soaking time (2 hours) + maturing time (7-8 days)
Cooking time: N/A

Ingredients:

2 cups of raw mangoes, shredded/ grated (tightly packed) 
3 cups sugar
1/2 teaspoon turmeric powder
1 tablespoon red chili powder
2 teaspoons cumin seeds (crushed)
1 tablespoon salt

Directions:
  1. Wash the mangoes and dry them. Peel the skin and then grate the mangoes. Combine the grated mangoes with salt and turmeric powder in a steel pot. Leave aside for two hours.
  2. Once the mangoes have been marinated you will find that they have given out some water. At this point, add sugar into the mixture. Stir continuously until the sugar is dissolved. 
  3. Wrap the pot with muslin or cheesecloth and tie it with a thick thread to fit tightly around the rim of the pot.
  4. Keep it under sunlight for about 7 to 8 days. Bring it back inside everyday once the sun sets, stir well the next morning and place it under the sun again. Do this until the sugar melts and reaches double-string consistency. It will take approximately seven to eight days. 
  5. When it is double string consistency, it means the Chunda is ready. Next, add red chili powder and crushed cumin seeds. Stir it until it is well combined into Chunda pickle.
  6. Chunda pickle is now ready to consume. Store the Chunda pickle in sterilized glass jar and it will last up to a year. Do not refrigerate.
  7. Serve mango Chunda with thepla or with anything in your plate that needs some sweet spice.

Monday, July 23, 2018

Tangy Lemon Pickle (Oil Free)

This is not an instant lemon pickle recipe. It requires some sunlight and few days, but the method and preparation is quick and easy. Spicy pickle is often had with Indian meals. It may be in the form of a lemon pickle, mango pickle or green chili pickle. You may even serve it with paratha, thepla, puri or chapatis. At home, our meal is not complete without pickle. During summertime, when pickle matures faster, I make mango pickle, lemon pickle and other varieties. This tangy and spiced no-oil lemon pickle may be served with your traditional Indian meals.

Preparation Time: 15 minutes

Ingredients:

6 to 7 medium size lemons (with thin skin)
1 tablespoon salt (for mix)
1 teaspoon salt (for maturing)
1 tablespoon red chili powder
1/2 teaspoon turmeric powder

Directions:
  1. Rinse the lemons very well in water. Then, spread them on a clean towel and let them dry naturally at room temperature. You may wipe them dry with a cotton towel or paper napkin.
  2. Next, take each lemon and cut four sides while keeping the lemon intact and whole. Do not cut through completely. Cut all the lemons the same way.
  3. In a bowl, squeeze a bit of juice from each lemon piece into a bowl. Do not squeeze the lemons too much. Remove the seeds from the lemons. Keep the lemon juice aside.
  4. In another bowl, mix the 1 tablespoon salt, turmeric powder and red chili powder. Mix very well. Now, with your finger or a spoon stuff this masala into each lemon and keep aside. Once finished, place the lemons in a glass bottle.
  5. Pour the lemon juice into the jar and add leftover masala, if any, onto the stuffed lemons in the bottle. Sprinkle some salt (1 teaspoon) over the lemons. This is done so that the lemons do not get spoiled while the pickle is maturing.
  6. Cover with a lid and keep the jar in sunlight for 4 days or until the pickle has become soft. Every day shake the jar. The pickle will be ready after this time. Then, you may serve it with your meals. Refrigerate the lemon pickle.

Wednesday, July 4, 2018

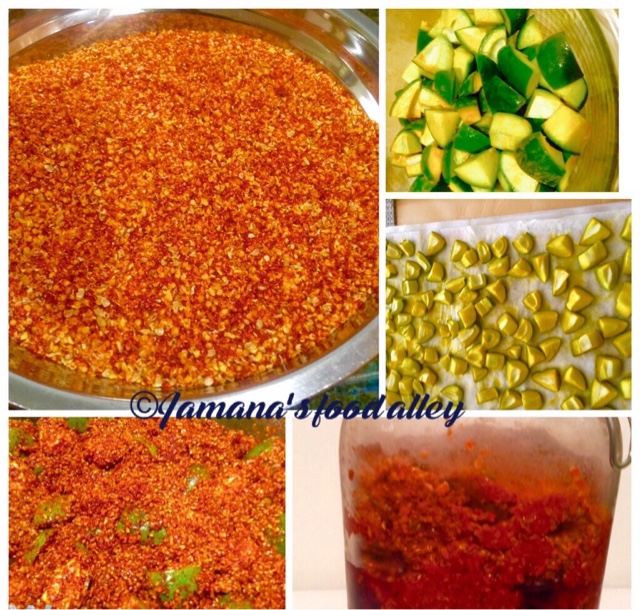
Mango Pickle/ Methi ni Keri

It's summertime! Time to stock up on pickles (mangoes)! I made this pickle with raw mangoes and freshly mixed masala. This popular pickle may be served as an accompaniment to all Indian recipes. It also tastes great with khakhras, thepla, paratha and khichdi. You may make this pickle instantly avoiding the marinate and drying steps, but I like to make it the traditional way, which I learned from my mom. My mom uses a lot of oil to soak the mango pickles, but here we use less oil. I really just use the oil just to soak the masala and help preserve in the refrigerator. It lasts long! This traditional method is sure to provide you with some tasty pickle for your meal.

Preparation Time: 20 minutes (+ marinate over 24 hours)
Cooking Time: 15 minutes
Servings: 2 cups pickle 

Ingredients:

1 1/2 cups raw mango, cubed
2 tablespoons salt
1/ 2 teaspoon turmeric powder

For Masala:

1/2 cup mustard/ rai oil
1/4 cup methi na kuria/ split fenugreek seeds
1/4 cup rai na kuria/ split mustard seeds
1/2 cup salt (adjust according to your taste level)
6 tablespoons red chili powder
1 teaspoon hing/ asafoetida 
1/2 teaspoon turmeric powder

Directions:

  1. In a bowl, combine the raw mangoes, salt and turmeric powder. Mix well and cover with a lid. Keep aside for one day. After one day, squeeze out all the water.
  2. Take a muslin cloth and evenly spread the raw mango cubes onto it and allow them to dry under a fan or sunlight for 2 to 3 hours (not directly in the sun). Then, keep aside. 
  3. Heat the mustard oil on a small pan on high flame until it releases an aroma (approximately 3 minutes). Keep aside to cool. Combine all the remaining ingredients with in a deep bowl and mix well.
  4. Add the dried raw mangoes cubes to the prepared mixture and mix well.
  5. Pour the mustard oil over the raw mango and spice mixture and mix well. 
  6. Put in an air tight container and keep at room temperature for three days and then refrigerate.
Note: I used less oil, but you may add more oil. Instead of 1/2 cup, use 1 cup oil.