Tuesday, August 11, 2020

Methi Na Ladva/ Ladoo

Methi na ladva is a traditional recipe which is more of a medicine than a sweet. This is typically given to mothers after they deliver a baby. It is also used as a, "cure," for back or joint pains during winter months. These ladvas are generally better consumed during the winter season. Fenugreek seeds contain many minerals and vitamins, which are beneficial for bone health. I learned this specific recipe from my mother. I may make a good ladva, but I still can't beat my mother's homemade methi ladva. She is the best at it! As it is currently winter time, it's time to make methi na ladva! Enjoy and stay warm!

Preparations Time: 30 minutes
Cooking Time: 45 minutes
Servings: 20 ladvas

Ingredients:
  • 2 cups wheat flour
  • 1 1/2 cups jaggery, finely shredded
  • 1/2 cup ghee (for jaggery)
  • 2 cups ghee (for flour)
  • 3/4 cup gund/ gum, finely ground
  • 3/4 cup shredded coconut (dry coconut; topravatki)
  • 3/4 cup almond, finely chopped
  • 2 tablespoons methi powder (Adjust methi powder according to your taste)
  • 4 tablespoons ginger powder
  • 3 tablespoons peepramul powder
Directions:
  1. In a kadai, add ghee and wheat flour. Roast the flour until it gets fragrant.
  2. Add gund powder and stir. Make sure the gund crackles. 
  3. Next, add almond, coconut, ginger powder and peepramul powder. Mix well.
  4. Turn of the gas and leave the kadai aside. 
  5. Take another kadai and, on a medium heat, add ghee and jaggery together. Stir continuously, When the jaggery melts (no lumps), turn off the stove. 
  6. Add the melted jaggery into the flour mixture and mix well. Allow it to cool a little bit. Then, add methi powder and mix well.
  7. Shape the mixture into round ladoos using your hands. The size of a ladoo is approximately bigger than golf ball, but smaller than a tennis ball. 
  8. Allow it to cool and store in an air-tight container.

Sunday, May 31, 2020

Dahi Wala Karela/ Bitter gourd

Dahi wala karela, literally translated, is bitter gourd cooked in yogurt. It's very tasty, healthy and easy to make. In our family, we always had karela in stuffed form known as bharvan karela. Sometimes, I also make it in a simple way by just slicing the karela. A few years ago, I came across a recipe at my friend’s home where it is made with the addition of plain yogurt, a few dry nuts, like cashews, and raisins. I gave it a try and to my surprise it was loved by everyone in the family. This recipe is definitely a keeper! Thanks to my friend Hema (from whom I learned) for this recipe. Do try and share your thoughts.

Preparation Time: 40 minutes
Cooking Time: 15 minutes
Servings: 4

Ingredients:
  • 4 bitter gourd (cut into round one-inch pieces and steamed)
  • 2 tablespoons oil
  • 1/2 cup yogurt
  • 2 teaspoons coriander powder
  • 1 teaspoon red chili powder
  • 1 teaspoon amchur/ dry mango powder
  • 1/4 teaspoon turmeric powder
  • 1 teaspoon salt to mix in karela
  • Salt to taste for making vegetable.
  • 1 tablespoon gud/ jaggery (optional)
  • 1 tablespoon chopped cashews
  • 1/2 teaspoon raisins
  • 1/4 teaspoon cumin seeds
  • 1/4 teaspoon mustard seeds
  • Pinch of hing (asafoetida)
  • 1 tablespoon chopped green coriander leaves (for garnish)
Directions:
  1. Scrape off the skin and wash the gourd. Chop off the ends and cut into one inch thick roundels.
  2. Sprinkle one teaspoon of salt on the karela and mix well. In a pot, add 1/2 cup of water and steam in a pressure cooker for one whistle.
  3. When it is cooled, remove the seeds from inside the karela and squeeze out the water.
  4. In a pot, heat oil and add mustard seed and cumin seeds. When they start to crackle, add a pinch of hing.
  5. Add cashews and raisins. Sauté for a few seconds. Then, add yogurt and all the spices except gud.
  6. Stir and mix well. Keep stirring and when the yogurt starts to boil, add steamed karela. Cover and cook for three to four minutes. Then, add gud/ jaggery and cook for another two to three minutes.
  7. Transfer into a serving dish.
  8. Garnish with chopped green coriander leaves
  9. Ready to serve hot with roti.

Thursday, March 19, 2020

Watermelon Rind Vegetable

A vegetable entree made from watermelon rind? Do you get it? Neither did I when my mother-in-law first mentioned it to me. This dish is very common in the Indian state of Rajasthan. My mother-in-law then taught me how to make it and it works well! This sweet and spicy vegetable is proof that watermelon rind may be used to make a tasty dish. So, friends, don’t waste the rinds! This recipe is good for the environment and even better for you. From rind you may also make chutney, pickles, rind preserves and watermelon rind candy. Try this vegetable recipe as a start to this novel option!

Preparation Time: 10 minutes
Cooking Time: 10 to 12 minutes
Servings: 4

Ingredients:
  • 4 cups watermelon rind (remove the green skin and cut into 1/2 inch pieces - see Image 1 below)
  • 2 tablespoons ghee
  • 1/2 teaspoon cumin seeds
  • 1/4 teaspoon mustard seeds
  • Pinch of hing/ asafotida 
  • 1 teaspoon Kashmiri red chili powder
  • 1 teaspoon coriander powder
  • 1/4 teaspoon jeera powder
  • 1/2 teaspoon amchur/ dry mango powder
  • 1/4 teaspoon sugar (optional)
  • 1/4 teaspoon turmeric powder
  • 1/4 teaspoon Garam masala (optional)
  • Salt, to taste
  • 1 tablespoon chopped green coriander leaves for garnish
Directions:
  1.  Melt ghee on a pan at medium heat.
  2.  Add cumin seeds and mustard seeds. Once they crackle, add a pinch of hing.
  3.  Add pieces of watermelon rinds, salt and mix well. By adding salt now, it will release water from the rind. Cover and cook for five minutes on medium-low heat. Remove the lid.
  4.  Add turmeric powder, red chili powder, coriander powder, jeera powder, amchur powder  and sugar (optional, depending on your personal taste). Mix well.
  5.  Cover and cook for another five minutes. Once the rind is soft, add garam masala (optional).
  6.  Mix well and cook for two minutes. Remove from heat.
  7.  Garnish with coriander leaves and serve hot with roti or rice. Enjoy!
Image 1: Watermelon Rind

Image 2: Complete


Wednesday, June 12, 2019

Whole Wheat Flour Sheera

This tasty and healthy sheera recipe is made from whole wheat flour, ghee and jaggery. You may use sugar, but I like to add jaggery instead to make this sheera more nutritious. A very important task while making this sheera is roasting the wheat flour. If you don't roast it properly the mixture becomes sticky. Sheera makes for a perfect dessert pudding on a cold winter day or holidays parties. The key is to use homemade ghee to get maximum flavor, texture and a smooth consistency. Enjoy the recipe!

Preparation Time: 15 minutes
Cooking Time: 15 minutes
Servings: 4

Ingredients:

1/2 cup whole wheat flour
4 tablespoons ghee (clarified butter)
8 to 10 almonds, sliced (boil and remove the skin)
1/2 teaspoon green cardamom powder
1/2 cup jaggery, grated
1 cup hot water

Directions:

1. Heat ghee in a kadai/ pan. Add flour and saute on low heat until it turns golden brown. 
2. Add 1 cup of hot water and cook, stirring continuously. Cook until the mixture thickens. 
3. Add grated jaggery and mix well. You should see ghee around the sheera. Add cardamom powder and mix.
4. Garnish with sliced almonds. Sheera is ready and should be served hot!

Saturday, April 27, 2019

Doodhi / Lauki/ Gourd Leaves na Patra

Patra made from doodhi leaves are especially tasty and delicious. To make this variation of patra, the procedure is the same as arbi/ colocassia leaves. However, the leaves are much thinner than arbi leaves. You cannot get doodhi leaves from the supermarket. The only way to really get leaves is to grow doodhi in your backyard or garden. In New York, I only get them in summertime, so I make them and freeze so whenever I want to eat, the patra are readily available. Just reheat and enjoy. In India, you may get the leaves from a farm. The Patra  stay fresh in a freezer for about three months. You may also make patra from spinach leaves with an easy swap in recipe! Enjoy!

Preparation Time: 15 minutes
Cooking Time: 20 minutes
Servings: 4

Ingredients:

12 doodhi leaves
1 1/2 cups gram/ besan flour
1 teaspoon green chili paste
1 teaspoon red chili powder
2 teaspoons coriander powder
1 teaspoon cumin powder
1/2 teaspoon coarse black pepper
1 teaspoon coarse coriander seeds
1 teaspoon turmeric powder
2 teaspoons sesame seeds
1 tablespoon tamarind pulp
2 tablespoons jaggery, grated
Salt to taste
3 tablespoons oil
1/2 teaspoon hing/asafoetida 
1 teaspoon mustard seeds
Scraped/ shredded fresh coconut for garnish (optional) 
Fresh chopped coriander leaves for garnish (optional)
1/2 teaspoon baking soda

Directions:

  1. Place a doodhi leaf with the vein side facing upwards on a clean dry surface and remove the vein using a Sharon knife. Clean the leaf on both sides using a wet mushy cloth. Repeat the procedure with all the leaves.
  2. Combine all the ingredients in a bowl: besan, green chili paste, red chili powder, coriander and cumin powder, coarse black pepper and coriander seeds, turmeric powder, baking soda, grated jaggery, tamarind pulp and salt. Add sufficient water and mix into a thick paste. 
  3. Apply this paste all over the back side of the leaf. Place another leaf over this with its pointed end opposite the bottom one. Apply the paste over this too.
  4. Fold the sides slightly and tightly roll. Repeat the method for the rest of the leaves. Put the rolls on a perforated plate and keep in a steamer. Cover with the lid and steam until cooked.
  5. Take the rolls out and let them cool completely. Slice the rolls into 1/2" thick slices and keep aside. 
  6. Heat oil in a pan/ kadai and add mustard seeds. When the seeds crackle, add hing and sesame seeds. Then, add patra slices and saute for two minutes.
  7. Garnish with coriander leaves and shredded coconut. I personally like patra without coconut and coriander leaves, so I didn't use them in the photos below. 
  8. Patra are ready to eat!


Monday, April 1, 2019

Surati Papadi Dhokli with Spinach and Methi Muthiya

I learned this recipe when I was visiting my friend in Surat. Her sister-in-law made it for lunch and I learned the process while observing her. So, whenever I get fresh papadi in New York, I try to make this dish. It is very tasty! Especially in the winter when you get papadi and fresh green garlic to mix together. Without the green garlic it is still yummy, but with it you can't beat the taste of Muthiya Dhokli. It is a winter delight. Try this recipe and enjoy the dish especially in the winter, rainy or snowy days.

Preparation Time: 10 minutes
Cooking Time: 20 minutes
Servings: 4

Ingredients:

For methi muthiya:
1 cup besan/ gram flour 
1 cup whole wheat flour
1 cup fresh methi/fenugreek leaves, chopped
1/2 cup fresh spinach, chopped
1 teaspoon turmeric powder
1 tablespoon coriander powder
2 teaspoons red chili powder
1 tablespoon green chili paste
1 tablespoon sugar
Salt to taste
2 teaspoons oil to knead a dough

For gravy:
2 cups fresh papadi
1 teaspoon ajwain
Pinch of hing/ asafoetida 
1/2 teaspoon turmeric powder
1 teaspoon dhana-jeera powder
1 teaspoon green chili paste
1/2 teaspoon red chili powder
1/2 teaspoon soda
Salt to taste
1 1/2 tablespoons oil 
1/4 cup fresh coriander leaves, chopped, for garnish
1/2 cup fresh green garlic leaves, chopped, for garnish
6 cups water

Directions:

  1. Wash and string the papadi. Keep aside.
  2. To prepare the methi-muthiya, in a bowl, add all the ingredients above and mix well. Add water, as required, and knead the dough. (Similar to a paratha consistency.)
  3. From the kneaded dough, roll out muthiyas shaped like cylinders. Keep aside. 
  4. In a cooking pan/ kadai, heat oil, add ajwain, hing and then add soda. Add papadi. When the papadi is almost cooked, add six cups of water. Add salt, turmeric, red chili powder and dhana-jeera powder. 
  5. After the water starts boiling, add all the muthiyas one-by-one and cover the pan. Then, lower the heat and let it cook on low flame for five minutes or until the muthiyas are cooked. 
  6. If you need to, add water to adjust the consistency of the gravy at this stage. 
  7. Turn of the stove, garnish with fresh coriander leaves and fresh chopped garlic. Serve hot.


Monday, March 11, 2019

Paneer-Potato Frankie

Frankie is a very popular street eat in Mumbai. These vegetarian wraps, stuffed with spiced potatoes and paneer, are good for brunch, lunch or dinner. It is very, "chatpata" and easy to make. There are various ways to make the wraps/ frankie - whatever stuffing you like you may make it with those ingredients. For example, potato-only stuffing, palak paneer, mixed vegetables, schezwan noodle, etc. Here, I am sharing the paneer-potato version. You may make Jain frankies using raw banana instead of potatoes. I hope you all like my recipe!

Preparation Time: 30 minutes
Cooking Time: 30 minutes
Servings: 4 (8 wraps)

Ingredients:

For filling: 
1 1/2 cups paneer (storebought), grated
3 green chilies, chopped
4 potatoes, boiled, peeled and mashed
2 tablespoons lemon juice
1 1/2 teaspoons red chili powder
2 teaspoons cumin powder, roasted
1/2 teaspoon turmeric powder
2 teaspoons dry mango/ amachur powder
1/2 cup fresh coriander leaves, chopped
4 teaspoons frankie/ chaat masala 
Salt to taste
Oil for shallow frying the patties

Dough ingredients:
1 1/2 cups all purpose flour/ maida
1/2 cup wheat flour
Salt to taste
3/4 cup milk
Water as needed
Oil for wrap

Garnishing : 
2 onions
1/2 teaspoon red chili powder
1/2 teaspoon amachur/ mango powder
2 tablespoons fresh coriander leaves, chopped
1/2 teaspoon black salt
Salt to taste

Chutney: 
Green chutney, use as per your taste (check my recipe)
Sweet and sour chutney, use as per your taste  (check my recipe)

Directions:
  1. In a bowl, mix both the flours, salt, milk and knead into a soft dough. You may add a little water to make the dough softer. Cover with a damp muslin cloth. Keep aside for at least 1/2 hour. Take a small ball of dough and roll out a circle (similar to roti). It should be thick, not thin. Place it on a hot skillet and roast on both sides. Prepare all the rotis similarly. You may also use store-bought wrap rotis too. 
  2. In a bowl, grate the paneer. Then, add mashed potatoes, salt, lemon juice, turmeric powder, red chili powder, roasted cumin powder, mango powder, chopped green chili, fresh chopped coriander leaves, chaat masala and salt to taste, 
  3. Mix well and shape the mixture into long-sized patties (see photos). Heat a little oil on a non-stick pan and cook these patties in it. Turn to cook both sides, remove and put onto a plate. 
  4. Chop the onions, coriander leaves, add all the spices and mix. 
  5. Heat the tawa, apply a little oil and warm the roti lightly until golden brown (see photos).
  6. On the roti, spread green chutney and sweet and sour chutney. Place a patty and on top of it, add marinated onions, sprinkle some chaat masala and fold the roti.
  7. Enjoy hot with green chutney and sweet and sour chutney on side as well.


Sunday, December 30, 2018

Roasted Spicy Chevda

Spicy poha chevda is a crunchy and savory snack that is quick and easy to make. When I was growing up, one of my friends from school always used to bring chevda and we would all will enjoy it. My mom preferred to make fried chevda, but I liked the roasted one. I enjoy this version of chevda to this day. For this recipe, I used a thin variety of poha commonly known as nylon poha. This mix may be stored in an air-tight container for several days. This guilt-free chevda is a good option for a mid- morning or afternoon snack.

Preparation Time: 5 minutes
Cooking Time: 10 minutes
Servings: 4

Ingredients:

2 cups beaten rice (poha)
2 tablespoons peanuts
2 tablespoons roasted chana dal
2 tablespoons cashews, chopped
10 curry leaves
1 teaspoon red chili powder
4 green chilies, slit lengthwise
1/4 teaspoon turmeric powder
1/2 teaspoon mustard seeds
2 teaspoons powdered sugar
2 teaspoons oil
Pinch of hing
Salt to taste

Directions:

  1. Roast the poha and peanuts on a non stick pan. Stir occasionally until the poha is crisp (approximately 4 to 5 minutes).
  2. Heat oil on a nonstick pan and add mustard seeds, cashews, green chilies, curry leaves and the roasted chana dal. Mix together.
  3. When the seeds start to crackle, add the asafoetida/ hing and turmeric powder. Mix well. Then, add the roasted poha and peanuts, sugar, red chili powder and salt. Mix together. 
  4. Let it cool and store in an air-tight container.

  5. Serve with hot tea as a snack.

Sunday, November 25, 2018

Masala Roti


Masala roti is really easy to make. You may eat it with chunda pickle or yogurt. When I am not in the mood to cook a vegetable entree, I make this roti. Especially, on Sunday for brunch. With very few ingredients required to make this roti, there is not much preparation time involved. The items you'll need to make this are generally readily available within your indian masala spice tray or fridge. Try this recipe and I hope you enjoy it!

Preparation Time: 5 minutes
Cooking Time: 15 minutes
Servings: 4 (makes 12 Rotis)

Ingredients:

3 cups whole wheat flour
1/4 cup ghee, approximately, plus ghee for brushing
6 teaspoons red chili powder or to taste
6 teaspoons dhana jeera powder (cumin and coriander powder)
6 tablespoons fresh coriander leaves, chopped
3 tablespoons green chilies (adjust according to your heat level), chopped
Salt for flour dough and masala, to taste
Whole wheat flour for dusting

Directions:
  1. In a bowl, add three cups flour, salt and water. Knead it into a smooth-soft dough. Rest the dough for 10 minutes. Divide the dough in 12 equal portions and roll them into balls.
  2. Dust with a little dry flour and roll into roti shape. Now, in the center, add red chili powder, dhana jeera powder, 1/4 tb chopped green chili, 1/2 tb green chopped coriander leaves, salt to taste and 1 teaspoon ghee. Mix and spread it evenly on the roti. Roll it from the upper side to the bottom in a cylindrical shape. Form it into a ball again (see photo).
  3. Press the ball and roll it again back into a roti. Heat the skillet, place the roti on it and cook on moderate heat for three minutes. Turn it and spread ghee over it. Then, spread ghee on the other side and shallow fry over low heat. Cook on low heat until golden brown.
  4. Serve hot with chunda, yogurt or both.


Sunday, November 4, 2018

Dabeli Sandwich Dhokla

Dabeli is traditionally made with bread and sold on the streets of Gujarati towns. It is a variation of vada pav made with a sweet and spicy potato mixture, which is filled into a small bun and then topped with onion, masala peanuts, pomegranate, fresh garlic chutney and sev. If you don't have pomegranate, you may also use black or green grapes cut into small pieces. Here, I have tried to recreate this a little differently than the original one. I use dhokla instead of bread. It is a combination of two famous Gujarati snacks - dhokla and dabeli. They make for perfect bites as a starter or snacks for your parties. I hope you enjoy this recipe!

Preparation Time: 30 minutes
Cooking Time: 30 minutes
Servings: 4 (as a meal) 

Ingredients: 

For Dhokla:

2 cups rava/ sooji/ cream of wheat
1 1/2 cup yogurt
2 teaspoons soda/ fruit soda
2 cups of water (approximately)
Salt to taste
  
For Dabeli Masala:

4 boiled potatoes (two cups mashed potatoes)
1/2 teaspoon cumin seeds
2 1/2 tablespoons Dabeli masala (store-bought)
2 tablespoons oil
2 tablespoons sweet and sour chutney (recipe)
2 tablespoons green coriander leaves, chopped
Salt to taste

For Garnishing:

1/2 cup green coriander chutney (recipe
1/4 cup garlic chutney (recipe)
1/2 cup finally chopped onions
1/2 cup pomegranate seeds/ anar Dana
1/2 cup nylon sev/ thin sev
1/2 cup masala peanuts
1/2 cup fresh coriander leaves, chopped
1/4 cup fresh coconut, grated

Directions:
  1. First, boil the potatoes. At the same time, we may prepare the sooji batter. In a bowl, add two cups of rava, 1 1/2 cup yogurt, salt and 2 cups of water. Mix well and keep aside for 10 minutes. After, add a little more water for the right consistency to make dhokla. Add fruit soda and when the bubbles form, mix gently.
  2. Pour the batter immediately into a 5" diameter greased four thali (I have a dhokla stand in which you may make four thalis at once). Shake the thali clockwise to spread the batter in an even layer.
  3. Steam in steamer for 10 minutes. Then, remove and let it cool for three minutes. Remove the whole dhoklas from the thali without cutting into pieces. Repeat the procedure so altogether you will have eight round pieces of dhokla .
  4. Next, heat oil on a pan and add cumin seeds. When they start to crackle, add dabeli masala and cook on medium flame for one minute. While stirring continuously, add the mashed potatoes, salt, sweet and sour chutney and a little water. Mix well and cook for another two to three minutes. Add fresh coriander leaves, mix and keep aside.
  5. Place the mixture into a bowl and add 1/4 cup chopped onion, 1/4 cup pomegranate seeds, 1/4 cup masala peanuts, 1/4 nylon sev, 1/4 cup chopped coriander leaves and 1/2 portion of grated coconut. Mix everything with the potato mixture. Save the rest for the garnishing. 
  6. Take one piece of whole dhokla on a plate and spread the dabeli mixture on the dhokla. Put another layer of dhokla on a top. Then, again spread the mixture on the dhokla. Garnish with masala peanuts, onion, pomegranate seeds, chopped green coriander leaves, sev and fresh grated coconut. Next, on top, garnish with sweet and sour chutney, garlic chutney and green coriander chutney.
  7. Repeat the same procedure with other dhoklas and dabeli mixtures. You will have four big dabelis.
  8. Cut into pieces and serve immediately.


Sunday, September 9, 2018

Gol Papadi/ Sukhadi/ Gur Papadi

Gol papadi is a traditional sweet recipe made especially during winter months. The combination of gol/ jaggery and wheat flour makes for a yummy sweet treat to snack on. This sweet is also known as sukhadi or gur papadi. It only requires a few ingredients yet is still flavorful and tasty. It is very quick and easy to make and the more ghee you use, the softer consistency you will get. I learned this recipe from my mom and today I am sharing this recipe with you all.

Preparation Time: 5 minutes
Cooking Time: 15 minutes 

Ingredients:

1 cup whole wheat flour
1/4 cup finely chopped almond (optional) 
1/2 cup ghee
1 tablespoon milk
1/2 cup gol/ jaggery (finely cut or shredded)
1 teaspoon melted ghee (to grease plate/ thali)

Directions: 
  1. On low flame, melt ghee in a heavy-bottomed pan. Add flour, stair continuously and saute until it turns light brown in color and a sweet aroma is present.
  2. Remove the pan from the stove and add 1 tablespoon of milk. Stir and then add the jaggery and chopped almonds. Stir for an additional three to four minutes until the gol melts and ghee separates.
  3. Immediately pour the mixture into a greased plate (thali). Spread and press evenly with the base of small bowl/ varka. 
  4. While still warm, mark deep cuts of square or diamond shapes into the mixture. Cool for an hour.
  5. Once set, remove the pieces with a steel spatula. Store in an airtight container.
Note: By adding a little milk, the sukhadi will be very soft and tastier too. The texture will be like the famous Mahudi version - Tirth's Sukhdi. 


Monday, August 20, 2018

Chundo (Sweet Mango Pickle)

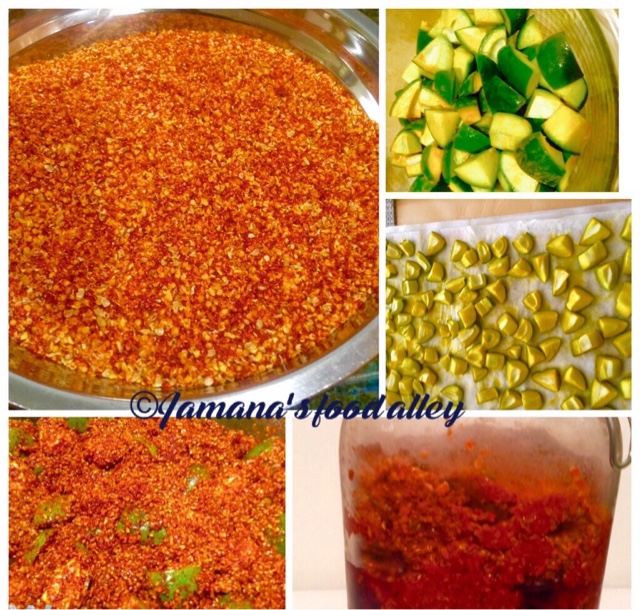
Chundo is a classic Gujarati sweet and spicy mango pickle that is made with raw mangoes, sugar and some spices. Chundo and thepla are a famous combination for most. Even children enjoy this pickle due to its taste. Make sure when you make this pickle that the mangoes are sour and are raw. They should not have the yellowish pulp, but rather have greenish pulp. Sweet and sour flavored Chunda is translucent and beautifully colored.

Preparation Time: 1 hour + soaking time (2 hours) + maturing time (7-8 days)
Cooking time: N/A

Ingredients:

2 cups of raw mangoes, shredded/ grated (tightly packed) 
3 cups sugar
1/2 teaspoon turmeric powder
1 tablespoon red chili powder
2 teaspoons cumin seeds (crushed)
1 tablespoon salt

Directions:
  1. Wash the mangoes and dry them. Peel the skin and then grate the mangoes. Combine the grated mangoes with salt and turmeric powder in a steel pot. Leave aside for two hours.
  2. Once the mangoes have been marinated you will find that they have given out some water. At this point, add sugar into the mixture. Stir continuously until the sugar is dissolved. 
  3. Wrap the pot with muslin or cheesecloth and tie it with a thick thread to fit tightly around the rim of the pot.
  4. Keep it under sunlight for about 7 to 8 days. Bring it back inside everyday once the sun sets, stir well the next morning and place it under the sun again. Do this until the sugar melts and reaches double-string consistency. It will take approximately seven to eight days. 
  5. When it is double string consistency, it means the Chunda is ready. Next, add red chili powder and crushed cumin seeds. Stir it until it is well combined into Chunda pickle.
  6. Chunda pickle is now ready to consume. Store the Chunda pickle in sterilized glass jar and it will last up to a year. Do not refrigerate.
  7. Serve mango Chunda with thepla or with anything in your plate that needs some sweet spice.

Monday, July 23, 2018

Tangy Lemon Pickle (Oil Free)

This is not an instant lemon pickle recipe. It requires some sunlight and few days, but the method and preparation is quick and easy. Spicy pickle is often had with Indian meals. It may be in the form of a lemon pickle, mango pickle or green chili pickle. You may even serve it with paratha, thepla, puri or chapatis. At home, our meal is not complete without pickle. During summertime, when pickle matures faster, I make mango pickle, lemon pickle and other varieties. This tangy and spiced no-oil lemon pickle may be served with your traditional Indian meals.

Preparation Time: 15 minutes

Ingredients:

6 to 7 medium size lemons (with thin skin)
1 tablespoon salt (for mix)
1 teaspoon salt (for maturing)
1 tablespoon red chili powder
1/2 teaspoon turmeric powder

Directions:
  1. Rinse the lemons very well in water. Then, spread them on a clean towel and let them dry naturally at room temperature. You may wipe them dry with a cotton towel or paper napkin.
  2. Next, take each lemon and cut four sides while keeping the lemon intact and whole. Do not cut through completely. Cut all the lemons the same way.
  3. In a bowl, squeeze a bit of juice from each lemon piece into a bowl. Do not squeeze the lemons too much. Remove the seeds from the lemons. Keep the lemon juice aside.
  4. In another bowl, mix the 1 tablespoon salt, turmeric powder and red chili powder. Mix very well. Now, with your finger or a spoon stuff this masala into each lemon and keep aside. Once finished, place the lemons in a glass bottle.
  5. Pour the lemon juice into the jar and add leftover masala, if any, onto the stuffed lemons in the bottle. Sprinkle some salt (1 teaspoon) over the lemons. This is done so that the lemons do not get spoiled while the pickle is maturing.
  6. Cover with a lid and keep the jar in sunlight for 4 days or until the pickle has become soft. Every day shake the jar. The pickle will be ready after this time. Then, you may serve it with your meals. Refrigerate the lemon pickle.

Wednesday, July 4, 2018

Mango Pickle/ Methi ni Keri

It's summertime! Time to stock up on pickles (mangoes)! I made this pickle with raw mangoes and freshly mixed masala. This popular pickle may be served as an accompaniment to all Indian recipes. It also tastes great with khakhras, thepla, paratha and khichdi. You may make this pickle instantly avoiding the marinate and drying steps, but I like to make it the traditional way, which I learned from my mom. My mom uses a lot of oil to soak the mango pickles, but here we use less oil. I really just use the oil just to soak the masala and help preserve in the refrigerator. It lasts long! This traditional method is sure to provide you with some tasty pickle for your meal.

Preparation Time: 20 minutes (+ marinate over 24 hours)
Cooking Time: 15 minutes
Servings: 2 cups pickle 

Ingredients:

1 1/2 cups raw mango, cubed
2 tablespoons salt
1/ 2 teaspoon turmeric powder

For Masala:

1/2 cup mustard/ rai oil
1/4 cup methi na kuria/ split fenugreek seeds
1/4 cup rai na kuria/ split mustard seeds
1/2 cup salt (adjust according to your taste level)
6 tablespoons red chili powder
1 teaspoon hing/ asafoetida 
1/2 teaspoon turmeric powder

Directions:

  1. In a bowl, combine the raw mangoes, salt and turmeric powder. Mix well and cover with a lid. Keep aside for one day. After one day, squeeze out all the water.
  2. Take a muslin cloth and evenly spread the raw mango cubes onto it and allow them to dry under a fan or sunlight for 2 to 3 hours (not directly in the sun). Then, keep aside. 
  3. Heat the mustard oil on a small pan on high flame until it releases an aroma (approximately 3 minutes). Keep aside to cool. Combine all the remaining ingredients with in a deep bowl and mix well.
  4. Add the dried raw mangoes cubes to the prepared mixture and mix well.
  5. Pour the mustard oil over the raw mango and spice mixture and mix well. 
  6. Put in an air tight container and keep at room temperature for three days and then refrigerate.
Note: I used less oil, but you may add more oil. Instead of 1/2 cup, use 1 cup oil.


Tuesday, May 29, 2018

Khaman Dhokla

Khaman dhokla is a famous Gujrati snack. It is readily available in every part of the state and also mostly everywhere in the country. People who love these dhoklas eat them for breakfast or as a savory accompaniment to lunch or dinner. The dhoklas may be made from gram flour or by soaking and grinding chana dal. It is then steamed in a steamer. With a variation in this recipe you may also make Amiri khaman dish. Here, I am sharing the recipe of besan khaman dhoklas.

Preparations Time: 10 minutes
Cooking Time: 15 minutes
Servings: 4

Ingredients:
  • 1 1/2 cups gram flour
  • 1 1/2 tablespoons rava/ sooji/ semtolina
  • 1 1/2 teaspoons lemon juice
  • 1 teaspoon Eno (fruit salt)
  • 1/4 cup yogurt
  • 1 teaspoon green chili and ginger paste (optional)
  • 2 teaspoons sugar
  • 3/4 cup water
  • 1 teaspoon oil for greasing
  • Salt to taste
  • 1 tablespoon fresh shredded coconut 
  • 2 tablespoons chopped green coriander leaves for garnish 
For Tempering:
  • 3 tablespoons oil
  • 3 to 4 green chilies, slit lengthwise and cut into halves
  • 4 to 5 curry leaves
  • 1 teaspoon sesame seeds
  • 1 teaspoon mustard seeds
  • A pinch of asafoetida 
Directions:
  1. In a bowl, combine the besan, rava/semolina, sugar, ginger-green chili paste, lemon juice and salt with approx. 3/4 cup of water. Mix well using a whisk to get a smoother batter. 
  2. Just before steaming, add the Eno and mix lightly.
  3. Pour the mixture into a greased thali and spread evenly by rotating the thali clockwise. Steam in a steamer for 10 to 12 minutes. Keep aside.
  4. Heat oil in a small nonstick pan. Add the mustard seeds. When the seeds crackle, add the sesame seeds, curry leaves, asafoetida, and green chilies. Sauté on medium flame for 20 seconds.
  5. Remove from the flame, add 1/2 cup water and wait for a few minutes until the water is absorbed.
  6. Pour the tempering over the dhoklas and spread evenly. 
  7. Cut into desired pieces and garnish with coriander leaves.
  8. Serve with green chutney.

Sunday, May 13, 2018

Spicy Stuffed Chilies

Spicy stuffed chilies are very easy to make and a great accompaniment to any Indian meal. The stuffing is made of gram flour mixed with some Indian spices. You may add other ingredients in the stuffing. The combination of hot chilies and mild tangy stuffing is extremely flavorful and makes for a great side dish. The best chilies for stuffing are Bhavnagari chilies, but they are unavailable in the US. So, we will use big long green chilies (or whatever is available). The selected chilies should be fresh and wrinkle-free.

Preparation Time: 10 minutes
Cooking Time: 10 minutes
Servings: 4

Ingredients:

  • 8 pieces of spicy long chilies
  • 2 tablespoons roasted gram flour
  • 2 teaspoons dhanajeera/ cumin, coriander powder
  • 1/2 teaspoon turmeric powder
  • Pinch of hing/ asafoetida 
  • 1/2 teaspoon mustard seeds
  • 1/2 teaspoon cumin seeds
  • 1/2 teaspoon amachur/ mango powder
  • 1/2 teaspoon garam masala
  • 1 teaspoon whole fennel
  • 4 tablespoons of oil plus 1 tablespoon for masala
  • Salt to taste
Directions:
  1. Wash the chilies, pat dry and remove the stalks (optional - I kept the stalks). Make a slit lengthwise keeping it joined on the other side. Cut all chilies similarly and then cut them in two inches long pieces. 
  2. Roast gram flour on low flame in a non-stick pan until it gets fragrant. Remove the flour from the pan into bowl. Then, add salt, garam masala, dhanajeera powder, turmeric powder, mango powder, garam masala and one teaspoon oil. Mix well .
  3. Stuff the slit chilies with masala. Press gently and likewise stuff all the chilies.
  4. Add oil in a pan/ kadai at medium-low heat. Allow it to get hot. Add mustard seeds and when they started to crackle, add cumin seeds and fennel seeds. Then, add hing and place the stuffed chilies in the pan and cover. Cook for 2-3 minutes on low flame.
  5. Keep tossing and flipping the sides until fully cooked. Take them out onto a plate.
  6. Serve these stuffed chilies with your meal and relish eating.

Thursday, April 19, 2018

White Khatta Dhokla (Idada)

White khatta dhokla is a delicious fluffy savory snack from the Indian state of Gujarat. It is made from rice and black gram (urad) dal. It is soaked overnight, ground the next day and fermented for about 6-8 hours thereafter before steaming. The, "khatta," in the name describes the flavor of this dhokla. The sourness is bought about by adding a little sour yogurt. Although ready mixes are available to do the job quickly, they cannot match the taste of traditional khatta dhokla made with homemade batter. So here, I will tell you how to make dhokla using a batter of rice and urad. This recipe requires advance preparation.

Soaking time: 5-6 hours
Preparation time: 5 minutes
Fermenting time: 8 hours
Cooking time: 30 minutes
Servings: 4

Ingredients:
  • 1 cup rice (washed and drained) 
  • 1/2 cup urad dal (washed and drained)
  • 2 teaspoons green chilli paste
  • 1 teaspoon ginger paste
  • 1/2 teaspoon red chili powder
  • 1/2 teaspoon baking soda (Eno)
  • 2 teaspoons oil for topping
  • 4 tablespoons fresh coriander leaves, chopped 
  • 1 teaspoon methi/ fenugreek Dana
  • 2 green chillis slit and cut 1 1/2" long
  • 1 cup sour yogurt
  • Salt to taste
  • 1 teaspoon mustard seeds 
  • Pinch hing/ asafoetida 
Directions:
  1. Soak the dal and rice separately. Add methi dana in both the bowls of dal and rice. Keep aside for 5-6 hours. Drain well and blend in a mixer using water and sour yogurt until it is a smooth consistency.
  2. Transfer the mixture into a deep bowl, add salt and mix well.
  3. Cover it with a lid and keep aside to ferment in a warm place for at least 8 hours. After fermentation, mix the batter well and add the green chili paste, ginger paste and baking soda, Mix well.
  4. Divide the batter into 4 equal portions. Pour a portion of the batter into a greased 7" thali and shake the thali clockwise to spread it in an even layer.
  5. Sprinkle red chilli powder on a batter. Steam in a steamer for 8-10 minutes until the dhoklas are cooked.
  6. Repeat steps 4-5 to make more three more thalis. Note: If you have a four thali stand then use that to make it easier since you may make all four thali together.
  7. In a small kadai, heat the oil and add mustard seeds. When they start to crackle, add hing and the slit green chili. Pour the mix on all four thalis of dhokla. Garnish with fresh coriander leaves.
  8. Cool slightly and cut into square or diamond shaped equal pieces using a knife. 
  9. Serve immediately with green chutney (Recipe).

Saturday, April 7, 2018

Methi ( fenugreek) Na Shakarpara

Shakarpara is a popular snack. Since it is very easy to make, it is typically made in large volumes. Especially during festive occasions like Diwali. Shakarpara may be made sweet or savory. Here is a namkeen Shakarpara, which is made with whole wheat flour, sesame seeds, spice powders and fenugreek leaves. It is served with hot tea to friends and family. Enjoy!

Preparation Time: 10 minutes
Cooking Time: 40 minutes
Servings: Approx. 3 cups

Ingredients:
  • 1 1/2 cups wholewheat flour
  • 1/2 cup methi/ fenugreek leaves, finely chopped 
  • 1 1/2 teaspoons red chili powder 
  • 1/4 teaspoon turmeric powder
  • 2 tablespoons sesame/ till seeds
  • 2 tablespoons ghee or oil
  • 1/2 teaspoon hing/ asafoetida 
  • Salt to taste
  • Oil for deep frying
Directions: 
  1. Mix all the ingredients well in a deep bowl and knead into a stiff dough using water. Divide the dough into five equal portions.
  2. Roll out a portion of the dough into a 7" diameter circle.
  3. Prick the surface with a knife and cut into diamond shaped pieces.
  4. Heat oil in a deep pan/ kadai and deep fry the shakarpara on low flame until they turn golden brown in color and crisp on both sides. Drain on a sheet of absorbent paper. 
  5. Repeat same steps to make Shakarpara in four more batches.
  6. Cool completely and store in an air tight container.

Saturday, March 24, 2018

Fada Ni Lapsi ( Broken Wheat )

Lapsi is a popular Gujarati dessert. It is comprised of roasted and cooked broken wheat sweetened with gur (jaggery) and flavored with cardamon powder. It is a traditional recipe loved by adults and children alike. This is one of the sweets we make during the festival of Diwali and also on any auspicious occasion. Lapsi is one of my favorite sweets and I have it with red chora (also known as red chori, red cow peas, etc). Here is a very simple and easy recipe to make Lapsi.

Preparation time: 10 minutes
Cooking time: 40 minutes
Servings: 4

Ingredients:
  • 1 cup broken wheat (dalia/ fada)
  • 1 cup jaggery (gur)
  • 1/2 teaspoon cardamon powder
  • 3 tablespoons blanched and sliced almond
  • 1/4 cup ghee
  • 3 cups of water (if you are using bigger size broken wheat, then use four cups of water)
Directions:
  1. Boil three cups of water in a pan with grated jaggery until the jaggery melts. Strain to remove any residue and set aside.
  2. Heat ghee in a pan or kadai and add the broken wheat. Sauté for a few minutes on medium-low heat.
  3. Roast the broken wheat until you get an aroma and the color changes to golden brown.
  4. Pour in the boiled jaggery mixture along with cardamom powder. Stir continuously. Cover with a lid and cook on medium-low heat until the water evaporates and ghee oozes out from the sides of the pan.
  5. Garnish with blanched and sliced almond. You may also use pistachio if you prefer.
  6. Serve hot with red chora.
Notes:  You may also cook using a pressure cooker on medium flame for four whistles.

Sunday, March 18, 2018

Stuffed Sweet Peppers

For this dish, you should get sweet peppers - not bell peppers/ capsicum. This will affect the taste quite a bit. Sweet peppers are softer and sweeter than bell peppers. These stuffed sweet peppers make for a nice accompaniment to any Indian meal and you may also stuff the sweet peppers with cheese, paneer, or potatoes to make a perfect appetizer dish as well. In the following recipe, I will describe making stuffed sweet peppers with everyday spices and gram flour. The taste of your meal will amplify serving these stuffed sweet peppers!

Preparation Time: 10 minutes
Cooking Time: 10 minutes
Servings: 4

Ingredients:
  • 8 sweet peppers (red, yellow, orange and/or green in color - variety will look more appealing)
  • 2 tablespoons roasted gram flour
  • 2 teaspoons dhanajeera/ cumin, coriander powder
  • 1/2 teaspoon turmeric powder
  • Pinch of hing/ asafoetida 
  • 1/2 teaspoon mustard seeds
  • 1/2 teaspoon cumin seeds
  • 1/2 teaspoon amachur/ mango powder
  • 1/2 teaspoon garam masala
  • 1 teaspoon whole fennel
  • 4 tablespoons of oil plus 1 tablespoon for masala
  • Salt to taste
Directions:
  1. Wash the peppers and pat dry. Make a slit lengthwise in a pepper keeping it joined on the other side. Cut all peppers similarly. (Removing the stalk is optional)
  2. Roast the gram flour on low flame in a nonstick pan until it gets fragrant. Remove the flour from the pan to a bowl. Add salt, garam masala, dhana-jeera powder, turmeric powder, mango powder, garam masala and one teaspoon oil. Mix well.
  3. Stuff the slit peppers with this masala from the open side. Press it gently thereafter to compact.
  4. Add oil in a pan/(kadai) on medium-low heat.  Once hot, add mustard seeds. When they start to crackle, add cumin seeds and fennel seeds. Then, add hing and place the stuffed peppers on the pan and cover. Cook for 2-3 minutes on low flame.
  5. Keep tossing and flipping until all sides are cooked. Then, take them out onto a plate.
  6. Serve the stuffed peppers with your meal(s) and enjoy!